We’ve all been there... It’s a hot, sticky afternoon, the kids are whining that they’re bored and you don’t want to spend a lot of money but you also don’t want to just stick them in front of the TV to drone out. What do you do?! We’ve got the perfect solution that will occupy your kids for hours. DIY projects! (Confused by the lingo? DIY stands for Do-it-Yourself.)
DIY activities are fun, creative, inexpensive life-hacks that encourage reusing, recycling and looking at ordinary items in a completely different, unique way. They’re also interesting enough to keep your child’s attention while easy enough that your little mini can do some of the steps by themselves. Your kids will love feeling independent! As caretakers, we love these activities because it also shows your children that they too can make something. It trains them to look at products and think, “What can I create with this? What steps do I need to take to start?” It’s a cognitive process that promotes problem-solving and creativity! As you can tell, DIY-ing is awesome in our opinion.
Parenting expert Tara Dennis of TheCarousel.com also supports DIY projects saying, “Creative projects help develop your child’s sensory stimulation, imagination and fine and gross motor skills. Not to mention the sense of pride they have creating something themselves.”
To start you on your DIY journey, we’ve compiled three fun and easy projects your kids will love! Buy the materials and have them on hand for the next time, “I’m boooored” strikes.
Jetpacks
 Image courtesy of Doodle Craft
These are too cute. We saw these jetpacks on Pinterest and knew instantly that most kids would go bananas over them. They’re also very easy to make.
- Step 1: Cut out a small rectangle roughly the width of your child’s back. Cut 2” horizontal slits near each corner.
- Step 2: Attach webbing or some sort of thick straps through the slits and knot. This will serve as the straps for the jets.
- Step 3: Take two 2 liter plastic bottles and spray paint them a light silver.
- Step 4: Cut out flames out of different colors of felt fabric.
- Step 5: Use a hot glue gun to glue the fabric into the spout of the bottles. Also use the hot glue gun to attach the bottles to the cardboard.
And voila! Your child is off to the moon and back with his or her new homemade jetpacks!
For detailed step instructions with photos see Doodle Craft.
Temporary Tattoos (1 Day)

courtesy of Wiki How
We love these temporary tattoos! They only last about one day, once water hits the design it will wash away quickly making the perfect tattoo for kids. We love that it encourages creativity, design and uses only two supplies - tracing paper and gel pens! It’s incredibly simple but provides a lot of fun!
- Step 1: Buy tracing paper and dark colored gel pens at your local arts supply store.
- Step 2: Design your tattoo and draw on the tracing paper. Heavily line and re-line the design with the gel ink but avoid making the ink “pool”.
- Step 3: Apply like a regular temporary tattoo! (Apply gently to skin. Wet a washcloth and press firmly on the back on the tracing paper. Slowly remove the paper.)
For detailed step instructions with photos see Wiki How.
Chalkboard Town
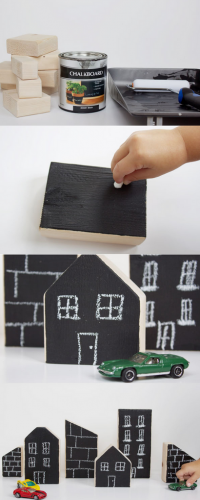
 Image courtesy of mommo-design.blogspot.i
Creating your own chalkboard town is easy and guess what?! The stores in the town can constantly change since your child can wipe away the chalk and start fresh whenever she/he feels like it! Again, this one’s so simple you could easily make it in less than an hour. Wait for the paint to dry. And then have a brand new, durable homemade toy set to last for months to come!
- Step 1: Buy small blocks, chalk and a can of chalkboard paint from your local hardware or crafts store.
- Step 2: Cover one side of the blocks with the chalkboard paint. Allow 1 hour or so to completely dry (check by touching lightly on sides of block).
- Step 3: Design your town with chalk on the blocks! Maybe there’s a dance studio, a hair salon, a fire station? Let your kid’s imagination run wild. The possibilities are endless!
We hope the DIY projects encourage you to try some fun at-home projects with your kids! Have a favorite project you’d like to share with the Hapari community?
Be sure to comment, tweet, or post about it and we’d love to share the tip!
t


